No edit summary |
Darksora110 (talk | contribs) No edit summary |
||
| (10 intermediate revisions by 7 users not shown) | |||
| Line 1: | Line 1: | ||
| − | {{Stub/PTR|5.1.0}} |
||
{{infobox instance |
{{infobox instance |
||
|name=Lion's Landing |
|name=Lion's Landing |
||
|aka= |
|aka= |
||
|ss=Lion's Landing loading screen.jpg |
|ss=Lion's Landing loading screen.jpg |
||
| − | |caption= |
+ | |caption=Loading screen |
|loc=[[Lion's Landing]], [[Krasarang Wilds]] |
|loc=[[Lion's Landing]], [[Krasarang Wilds]] |
||
| + | |race={{Race|Human}}<br />{{Race|Orc}}<br />{{Race|Draenei}}<br />{{Race|Dwarf}}<br />{{Race|Goblin}}<br />{{Race|Tauren}}<br />{{Race|Troll}} |
||
| − | |race= |
||
|boss= |
|boss= |
||
|type=Scenario |
|type=Scenario |
||
|level=90 |
|level=90 |
||
| + | |minlevel=90 |
||
| + | |ilvl=425 |
||
|players=3 |
|players=3 |
||
|bosses= |
|bosses= |
||
}} |
}} |
||
| − | ''' |
+ | '''Lion's Landing''' is an [[Alliance]]-only scenario in ''[[World of Warcraft: Mists of Pandaria]]''. |
==Background== |
==Background== |
||
:''Expel Horde forces from the keep of Lion’s Landing!'' |
:''Expel Horde forces from the keep of Lion’s Landing!'' |
||
| − | + | The Alliance has found a foothold on the continent of Pandaria, and begun to build up their holdings on the defensible beachfront of Lion’s Landing. |
|
| − | + | As if on cue, the Horde has responded, dispatching a squad of trained soldiers to strike at Lion’s Landing, and shatter Alliance pride and defenses in one brutal assault. In order to ensure that the Landing survives long enough for Alliance forces to expand deeper into Pandaria, you’ll first fight off waves of attackers and then crush the Horde’s commander. Beware – the Horde’s forces can and will surprise you with their tactics and abilities. Send them home disheartened or dis-hearted.<ref>http://us.battle.net/wow/en/zone/lions-landing/</ref> |
|
| + | ==Scenario denizens== |
||
| − | ==Overview== |
||
| + | [[File:VZ-Lion's Landing.jpg|thumb|Scenario map]] |
||
| − | [[File:Stub.png|20px]] ''Please add any available information to this section.'' |
||
| + | {|class=darktable |
||
| + | !Stage !! Hostile !! Friendly |
||
| + | |- |
||
| + | !Stage 1 |
||
| + | | |
||
| + | *{{Mob|Bloodhilt Battlemage|icon=BloodElf Female}} |
||
| + | *{{Mob|Bloodhilt Earth-Singer|icon=Orc Female}} |
||
| + | *{{Mob|Bloodhilt Grunt|icon=Orc Male}} |
||
| + | *{{Mob|Bloodhilt Lightsworn|icon=BloodElf Female}} |
||
| + | | |
||
| + | *{{NPC||Daggin Windbeard|icon=Dwarf Male}} |
||
| + | |- |
||
| + | !Stage 2 |
||
| + | | |
||
| + | *{{Mob|Bloodhilt Battlemage|icon=BloodElf Female}} |
||
| + | *{{Mob|Bloodhilt Earth-Singer|icon=Orc Female}} |
||
| + | *{{Mob|Bloodhilt Grunt|icon=Orc Male}} |
||
| + | *{{Mob|Bloodhilt Lightsworn|icon=BloodElf Female}} |
||
| + | *{{Mob|S.H.A.R.K. Medic|icon=Goblin Female}} |
||
| + | *{{Mob|S.H.A.R.K. Rocketeer|icon=Goblin Male}} |
||
| + | *{{Mob|S.H.A.R.K. Sapper|icon=Goblin Male}} |
||
| + | | |
||
| + | *{{NPC||Admiral Taylor|icon=Human Male}} |
||
| + | |- |
||
| + | !Stage 3 |
||
| + | | |
||
| + | *{{Mob|Bilgewater Field Medic|icon=Goblin Female}} |
||
| + | *{{Mob|Bilgewater Grenadier|icon=Goblin Male}} |
||
| + | *{{Mob|Bloodhilt Battlemage|icon=BloodElf Female}} |
||
| + | *{{Mob|Bloodhilt Earth-Singer|icon=Orc Female}} |
||
| + | *{{Mob|Bloodhilt Grunt|icon=Orc Male}} |
||
| + | *{{Mob|Bloodhilt Lightsworn|icon=BloodElf Female}} |
||
| + | *{{Mob|Bloodhilt Raider|icon=Orc Female}} |
||
| + | *{{Mob|Bloodhilt Wolf|icon=Wolf}} |
||
| + | *{{Mob|Bloodhilt Wolf-Sister|icon=Orc Female}} |
||
| + | *{{Mob|Uduji Berserker|icon=Troll Male}} |
||
| + | *{{Mob|Uduji Hexer|icon=Troll Female}} |
||
| + | | |
||
| + | |- |
||
| + | !Stage 4 |
||
| + | | |
||
| + | | |
||
| + | *{{NPC||High Marshal Twinbraid|icon=Dwarf Male}} |
||
| + | |- |
||
| + | !Stage 5 |
||
| + | | |
||
| + | | |
||
| + | *{{NPC||Amber Kearnen|icon=Human Female}} |
||
| + | *{{NPC||Mishka|icon=Draenei Female}} |
||
| + | *{{NPC||Sully "The Pickle" McLeary|icon=Dwarf Male}} |
||
| + | |- |
||
| + | !Stage 6 |
||
| + | | |
||
| + | | |
||
| + | |- |
||
| + | !Final Stage |
||
| + | | |
||
| + | *{{Mob|Baxel Brassbombs|icon=Goblin Male}} |
||
| + | **{{Mob|Bilgewater Field Medic|icon=Goblin Female}} |
||
| + | **{{Mob|Bilgewater Grenadier|icon=Goblin Male}} |
||
| + | *{{Mob|Sunwalker Chagon|icon=Tauren Male}} |
||
| + | **{{Mob|Bloodhilt Mauler|icon=Bear}} |
||
| + | **{{Mob|Bloodhilt Raider|icon=Orc Female}} |
||
| + | *{{Mob|Wolf-Rider Gaja|icon=Orc Female}} |
||
| + | **{{Mob|Bloodhilt Wolf|icon=Wolf}} |
||
| + | **{{Mob|Bloodhilt Wolf-Sister|icon=Orc Female}} |
||
| + | **{{Mob|Gaja's War-Wolf|icon=Wolf}} |
||
| + | *{{Mob|Dark Cleric Laresa|icon=Undead Female}} |
||
| + | **{{Mob|Devious Shadowfiend|icon=Fleshbeast}} |
||
| + | **{{Mob|Dreadguard Cavalry|icon=Undead Male}} |
||
| + | **{{Mob|Felhand Demon-Speaker|icon=Troll Female}} |
||
| + | *{{Mob|Thaumaturge Saresse|icon=BloodElf Female}} |
||
| + | **{{Mob|Bloodhilt Battlemage|icon=BloodElf Female}} |
||
| + | **{{Mob|Bloodhilt Lightsworn|icon=BloodElf Female}} |
||
| + | *{{Mob|Uduji|icon=Troll Male}} |
||
| + | **{{Mob|Uduji Berserker|icon=Troll Male}} |
||
| + | **{{Mob|Uduji Hexer|icon=Troll Female}} |
||
| + | |} |
||
| − | == |
+ | ==Stage guide== |
| + | ===Stage 1: The Flight Master=== |
||
| − | [[File:Stub.png|20px]] ''Please add any available information to this section.'' |
||
| + | :''Join up with [[Daggin Windbeard]].'' |
||
| + | ===Stage 2: Death on the Docks=== |
||
| ⚫ | |||
| + | :''Fight your way through the docks to [[Admiral Taylor]].'' |
||
| + | ===Stage 3: Reclaim the Court!=== |
||
| ⚫ | |||
| + | :''Defeat the Horde forces assaulting the keep.'' |
||
| − | ==Stage |
+ | ===Stage 4: The High Marshal=== |
| + | :''Locate [[High Marshal Twinbraid]] and help repel the Horde assault.'' |
||
| − | [[File:Stub.png|20px]] ''Please add any available information to this section.'' |
||
| + | |||
| + | ===Stage 5: Legwork=== |
||
| + | :''Gather information from the SI:7 team.'' |
||
| + | |||
| + | ===Stage 6: Setting Up=== |
||
| + | :''Set up Sully's weapons and prepare to defend the keep!'' |
||
| + | |||
| + | ===Final Stage: Hold the Line!=== |
||
| + | :''Hold the keep against waves of Horde invaders and their commander.'' |
||
| + | |||
| + | ==Achievements== |
||
| + | *[[Lion's Landing (achievement)]] |
||
| + | *[[Number Five Is Alive (Alliance)]] |
||
| + | *[[Waste Not, Want Not (Alliance)]] |
||
==Gallery== |
==Gallery== |
||
| ⚫ | |||
| ⚫ | |||
==Video== |
==Video== |
||
<vplayer/> |
<vplayer/> |
||
| + | *{{#vlink:mJiK5lWNrEc|Lion's Landing by Nialinius}} |
||
==Patch changes== |
==Patch changes== |
||
| − | *{{Patch 5.1.0|note=Added}} |
+ | *{{Patch 5.1.0|note=Added.}} |
==References== |
==References== |
||
| Line 52: | Line 151: | ||
Repeat violations may result in a BAN. |
Repeat violations may result in a BAN. |
||
Have a nice day. :) --> |
Have a nice day. :) --> |
||
| − | {{elinks-zone|}} |
+ | {{elinks-zone|6575}} |
{{Scenarios|Mists of Pandaria}} |
{{Scenarios|Mists of Pandaria}} |
||
Revision as of 22:35, 17 January 2014
| Lion's Landing | |
|---|---|
 Loading screen | |
| Location | Lion's Landing, Krasarang Wilds |
| Race(s) |
|
| Instance info | |
| Type | Scenario |
| Advised level | 90 |
| Minimum level | 90 |
| Minimum average item level | 425 |
| Player limit | 3 |
Lion's Landing is an Alliance-only scenario in World of Warcraft: Mists of Pandaria.
Background
- Expel Horde forces from the keep of Lion’s Landing!
The Alliance has found a foothold on the continent of Pandaria, and begun to build up their holdings on the defensible beachfront of Lion’s Landing.
As if on cue, the Horde has responded, dispatching a squad of trained soldiers to strike at Lion’s Landing, and shatter Alliance pride and defenses in one brutal assault. In order to ensure that the Landing survives long enough for Alliance forces to expand deeper into Pandaria, you’ll first fight off waves of attackers and then crush the Horde’s commander. Beware – the Horde’s forces can and will surprise you with their tactics and abilities. Send them home disheartened or dis-hearted.[1]
Scenario denizens
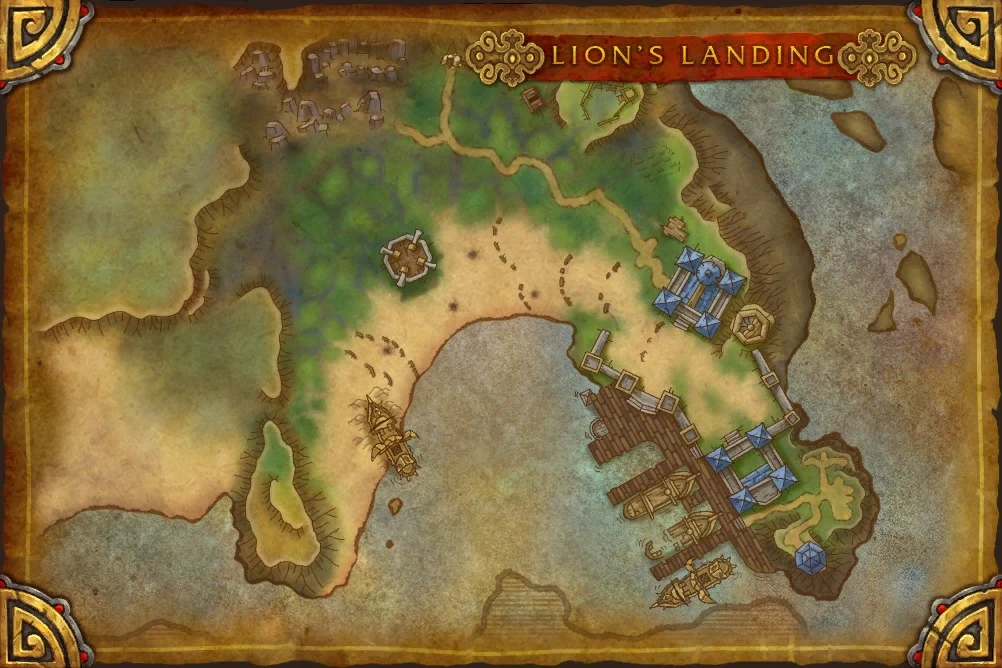
Scenario map
| Stage | Hostile | Friendly |
|---|---|---|
| Stage 1 | ||
| Stage 2 | ||
| Stage 3 | ||
| Stage 4 | ||
| Stage 5 | ||
| Stage 6 | ||
| Final Stage |
Stage guide
Stage 1: The Flight Master
- Join up with Daggin Windbeard.
Stage 2: Death on the Docks
- Fight your way through the docks to Admiral Taylor.
Stage 3: Reclaim the Court!
- Defeat the Horde forces assaulting the keep.
Stage 4: The High Marshal
- Locate High Marshal Twinbraid and help repel the Horde assault.
Stage 5: Legwork
- Gather information from the SI:7 team.
Stage 6: Setting Up
- Set up Sully's weapons and prepare to defend the keep!
Final Stage: Hold the Line!
- Hold the keep against waves of Horde invaders and their commander.
Achievements
Gallery
Video
Patch changes
 Patch 5.1.0 (2012-11-27): Added.
References
External links
| ||||||||||||||